Focus!
When I was thinking about the atmosphere for our wedding, I knew I wanted to have a strong focal point at our reception. Perhaps something of an art installation. An elegant design that would be eye-catching and symbolic.
Art deco emerged as our wedding style early on, so I sought a project that made sense with that aesthetic. Several library books referenced the influence of Japanese art and origami on Art Deco. This intrigued me. I had not done origami in years, and I loved the idea of handcrafting my way to a focal point for our big day.
How I stumbled upon the Japanese tradition of 1,000 origami paper cranes, I know not, but I did know right away that this was my focal point project. Tradition states that a woman who folds 1,000 cranes will be granted a long and prosperous marriage. What’s not to love? The patience, stamina, and attention required to fold 1,000 cranes are the same qualities necessary to sustain a marriage. Also, this project fit my vision–Beauty: check! Strong focal point: check! Hand-crafted: check! Symbolic: check! This was a big deal, because often, my projects don’t fit a particular vision; I just want to do something crazy cool. Not that there is anything wrong with “crazy cool”, but it’s nice when outlandish feats coincide with a genuine purpose beyond outlandish.
In my initial research to determine timeline and materials, I found some pictures of 1,000 cranes on the web here and there. I easily located instructions for folding a single crane, but found no instructions as to the assemblage and display of all 1,000 cranes. I decided to start folding and worry about installation later. In this post, I promise to share instructions on installation, because if you think folding 1,000 birds is tough, wait until you try to get the flock to “fly”. I don’t say this to discourage you from replicating this project, but to give you a sense of the dedication required to complete it! (And proper gratitude for my DIY instructions.)
Never having folded 1,000 cranes before, I wasn’t sure how long it would take, so I folded a few dozen, and when I was pretty darn fast, I clocked myself…2 minutes per bird! That’s 2,000 minutes total…or 33 hours…or 40 hours, since I always manage to underestimate completion time. About a solid week worth of work, working full-time. I decided to give myself a month or two, and that way, I would only have to work a few hours at a time.
Folding 1,000 cranes turned out to be not only a cool project for our wedding day, but also a calming process in the stressful months that preceded the wedding. Folding is a meditative act. As I folded the cranes, one by one, I understood the roots of the tradition and how it relates to marriage. Folding the first hundred or two was novel and exciting; after that, some serious patience was required with a constant focus on the end goal; during the last hundred or two, as I anticipated it all coming together, it became easier again.
The cranes carried me through a book on tape, a Hitchcock marathon, and several very long bi-coastal phone calls with Jonathan (which would soon enough be a thing of the past!). But often times, I just needed to zone out, and fell into spurts of smooth, repetitious folding, the way an exhausted person falls into bed—grateful and relieved.
And now for the stressful portion of the 1,000 cranes project! I was SO pleased with myself when I was done folding, sitting at the dining room table filled and piled high with silver cranes, when it hit me: Holy crap. Now I have to figure out how to display these. What was I thinking?! Oh right, I was thinking that certainly, the folding of the cranes would be tougher and more time-consuming than their display. In typical Kaitlyn fashion, I pushed forward with a project determined to make it work despite potential future obstacles and bit off more than I could chew.
Given that the wedding was T minus 7 days, my mom decided it was time for an intervention. She was trying really hard to let me be CEO of this wedding, but boy am I glad she stepped in and saved the day. She rallied two crane assembly teams, and within a few hours of work over two nights, all the cranes were strung and ready to be hung. (And I have to give my mom major props on this, because she did not wholeheartedly support this hair brained scheme. She lovingly referred to my cranes as “the damn birds”.)
Thanks to my dear friend, Trish, the cranes were separated onto clothing hangers, strung across a clothesline in the back of her Subaru, and transported to the reception site.

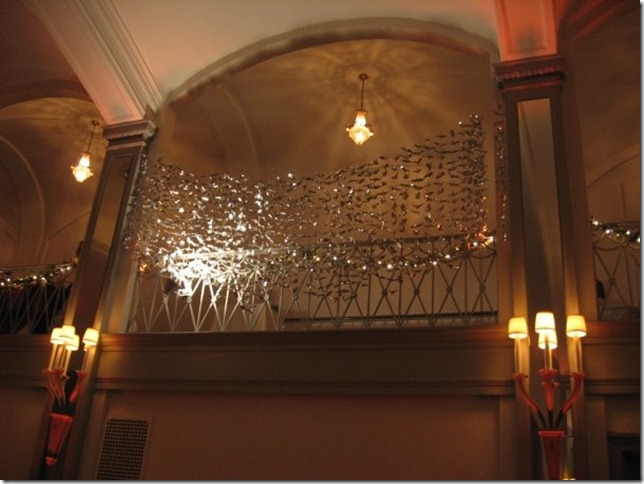
Of course, the final hanging proved to be the most difficult task of all. I wanted the cranes to hang in the arch on the second floor of the ballroom, so they would be highly visible from above and below. The plan was to hang them from a horizontal metal pole that would be duct-taped into place on top of two columns in the archway. During set-up (i.e., the day before the wedding), we realized this would not work. The pole was too big and heavy and would not stay in place.
Thank God, my design professor from college was there to help with the installation. The cranes were pretty much the last straw for me and while I was busy finally having a meltdown, she stepped in with a “Save the Cranes” campaign, rallying the troops and proposing an alternative solution. With the clock ticking, she found simple and available materials (clear fishing wire and candle wax), and proposed that we run fishing wire between two small hooks that happened to be installed on either column. After much finagling and untangling, a team of five helpers strung all the vertical strands onto the massive horizontal strand. And thanks to my brother and his amazing “stand on a ladder for an hour” skills and “pull-pull-pull on the fishing wire until it was taut enough but without breaking it” skills, the birds were finally in the air. (And I have to tell you, we were all really holding our breaths on the last one…if the fishing wire snapped, it would have all been over…) Here is a team work photo:
From there, the challenge became: how do we keep the individual strands of cranes (~40 total!) separated so they don’t all sag to the middle of the fishing wire? That’s where the candle wax came in—Professor Evans pinched a pea-sized blob of wax onto each individual vertical strand to hold it in place along the length of the horizontal wire. Brilliant, brilliant, brilliant. Seriously. It was like watching an episode of Top Chef, where you have two hours to put together an extravagant 4 course meal. Prof Evans pulled it off, just under the wire, and we all raced off to the rehearsal.
The final product exceeded all my expectations—the cranes were stunning, glittery, and elegant. More importantly and unexpectedly, though, there were lessons to be learned. Not only the individual patience and stamina required to tend to a marriage over the course of decades, but also the friends, family, and teamwork that make life worth living. Would I do the 1,000 cranes over again, drama and all? Absolutely! For a very independent person, the realization of the importance of relationships alone was worth it.
Are you thinking about doing a 1,000 paper cranes display of your own? Here are my DIY instructions, and food for thought:
Pre-folding
1) Think about color. Should you go with one color or multiple colors? Various colors can work if you’re going for a more informal look or if you don’t mind spending extra time thinking about the spacing of various colors (i.e., will you string the cranes in a pattern?—e.g., red, orange, yellow, red, orange, yellow—or will you string them randomly?) However, I think it’s easiest and simplest to go with a single hue, or perhaps tints and shades of a single hue. Also, if you want a natural look, go with matte paper. We were going for sophisticated and glitzy (yeah Art Deco!), and accordingly, we went with silver metallic paper, which reflected the lights and candlelight very nicely.
2) Think about scale. Which size origami paper to choose? Think about the space where you want to display the cranes. Is it small or big? Is it close to your guests or far away? Since my cranes were hanging from the ceiling high above most of our guests, I bought the largest size paper possible (6 inches square) for greatest effect. If the cranes are part of the table centerpieces, or if you want a daintier look, try 3- or 4-inch square paper.
Folding the cranes
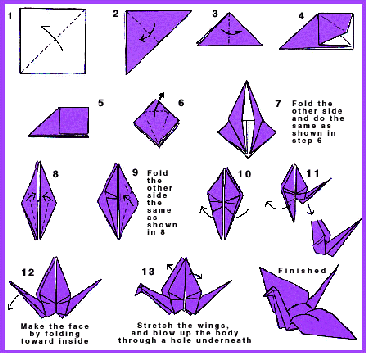
3) Find folding instructions online, practice, and then time yourself. Instructions abound online, both in photo and video version. Fold a package of paper (50 sheets or so), and once you’re pretty good, time yourself so you can get a sense of how long you’ll need to complete folding 1,000.
4) Allocate space for the cranes. This sounds like a no-brainer, but seriously, make sure you have enough space to store them! I had to delay the start of my crane-folding until two months before the wedding, when I moved from Boston to New York (where the wedding was taking place), because the cranes literally would have filled my entire car, and I would have had to leave all my other belongings behind. The other thing you can do to minimize their volume is to fold them up until almost the very last stage—when they’re almost completed, but they’re still flat—before you open the wings. This keeps the volume down and prevents them from getting damaged in their vulnerable, open-winged stage.
Stringing and displaying the cranes
5) Figure out how you will display the cranes. There are two decisions you need to make: (a) Will you hang them in one large cluster altogether, or spread them throughout a space? and (b) What will they be hanging from?
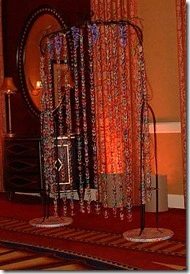
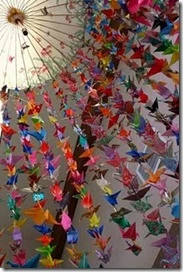
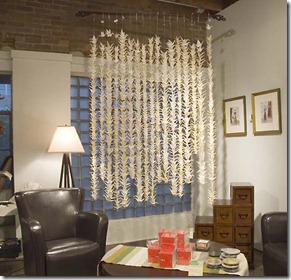
Here are several different display ideas: hanging from trees, hanging from an arbor, and chandelier-style.
Probably the easiest way to hang them (and what I saw lots of examples of online) was to buy or rent an arbor or archway and hang the strands from the top of the structure.
If you want to hang them from part of the architecture of a building, like I did, it gets trickier. Of course, it’s easiest to hang them from a straight, horizontal pipe or rod of some sort, if the pipe can be secured into place. Otherwise, you can try your hand at stringing them on fishing wire. More on that later. Just keep in mind that the wider the space and the heavier your cranes, the harder it will be to keep the fishing wire from snapping. I was working with a 12-14ish foot piece of fishing wire, and that was really pushing it.
6) Calculate your space. How big of a space you have to work in may define the spacing of the cranes when you string them, and the size origami paper you choose. If you’re hanging the cranes freely, say, outside from tree branches, then you don’t need to think about this. But if you’re hanging them from an arbor, or within an archway (like I did), you need to make sure your birds are the right size and are spaced appropriately. I wanted each strand to be between 3-5 inches apart, and the space I was trying to fill was about 11 feet wide by 5 feet tall. From there, I was able to figure out how many strands of cranes I needed, how many cranes per strand, and how far apart the strands should be from each other.
7) Stringing the cranes. The best material for stringing cranes is clear fishing wire, because it’s almost invisible, and it doesn’t break as easily as thread. Once you figure out how long each strand should be, make sure you add about 5 inches extra to form the loops on top where each strand will hang. Cut all your strands at once, and tie your loops ahead of time. From here, you can proceed two ways. You can string your birds like this:
or you can do it the way I did and space them like this:
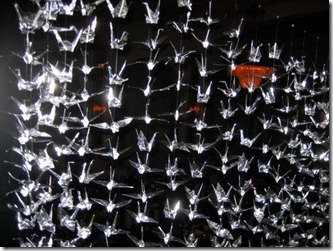
The advantage to the first is you don’t have to worry about spacing because you’re just stringing the birds on like beads. However, I think the second, while more time consuming, is prettier and more airy—you can really see the birds. If you opt for the latter, you’ll need some seed beads and a thin needle. String the end of your fishing wire onto a needle, and then string your crane on, closest to the end with the loop for hanging, poking a hole through the top of the bird’s body, and going down through the bottom of the body. Position the bird where you want it on the string. Then, string your seed bead onto your fishing wire, and tie the bead to the fishing wire, so it can’t move around. You’ll see that your bird will now “sit” on top of the bead. String another crane onto the fishing wire, position it 4 inches below the first (or however far apart you want them to sit) and then string and tie on another seed bead. Continue until your strand is complete. If you’re spacing the birds with beads, don’t underestimate how long this step will take!!! It is just as hard as folding, and you need a good set of eyes and great dexterity to pull this off.
8) Protecting and transporting the cranes. Once you’ve strung the cranes, you need a good way to store them until go time. I recommend getting some clothes hangers and putting no more than 3-4 strands of cranes on each, so they don’t get tangled. If you’re transporting the cranes, lay them flat on a car seat, or even better, find someone with an SUV or van, fold down the seats, and lay out the cranes on the hangers.
9) Hanging the strands of cranes. If you hang the birds from a straight horizontal structure, you don’t have to worry about this—they’ll all stay put and behave. However, if you want to hang them from two points on a flexible material (e.g., fishing wire) that bows into a convex shape, you’ll need to have a way to space them. I highly recommend candle wax, or some other sticky yet clear substance (poster putty would work too, but it’s not quite transparent). If you’re hanging strands from trees, you might try thumb tacks. There are so many ways to display cranes—so I can’t think of all possibilities—but whatever you do, have a good plan ahead of time, and test it out! Make sure the glue, tack, wax-whatever—will hold up. (Oh, and don’t use a glue gun with fishing wire—it will melt!)
10) Finishing touches. You’ve put so much effort into this project as a focal point, so make extra sure it shines! I used a $10 clip-on desk lamp from Target as an uplight to reinforce the cranes as a focal point and to help the metallic paper really SPARKLE!
And what better word than sparkle to end a blog post? These DIY instructions feel exhaustive; I can’t think of anything else to add. However, if the directions aren’t clear or a detail is missing, just ask, I am happy to clarify.
Good luck getting your flock to fly!



Thanks so much for all of your tips!
I’m about to start the mammoth task of creating 1000 cranes for my wedding next year and this has been so helpful!
Thanks again,
Anna 🙂
Thanks, Anna! I’m thrilled that you found my blog and that it was helpful to you. Happy folding!!
Just want to say thanks for the article.
Well done, and congratulations!
I am just curious… do you have to fold them all by yourself or can you get help from others? Like I am thinking my sisters and I can all collaborate our work and do 1,000 Origamis and keep it at our living room… maybe get help from our friends too… is it something that ONE person must do? Thanks
Hello! Absolutely make it a group project if you like! I didn’t mind folding tons of cranes on my own, but I really needed help toward the end to pull it all off. It was a great feeling to complete an amazing project with the help of loved ones. Working on it together will give you good bonding time and great memories for years to come!!
I’m doing the 1000 cranes project for my wedding and although I’m up to about 800 in multiple colors, I am absolutely IN LOVE with how yours turned out that I want to steal the idea of doing all silver and accenting it with a light! I’m doing multi-colors for my outdoor reception, but I’m also having an arbor made and I think if I get the lighting right, having all silver behind us during the ceremony would be amazing! Great job, it looks amazing hanging up!
Where did you find your paper?
Hi there! I had a VERY tough time deciding between multicolor and silver…and in the end I went with silver b/c it was easier to string (didn’t have to think about color order) and because we thought silver had a more vintage, art deco feel. You are lucky to have an outdorr reception–I think cranes would be so, so pretty blowing in the breeze, or with the sun hitting them! My paper is from zensuke.com (http://www.zensuke.com/810012.html). I used the 6 inch silver foil. It cost $89.50 for 1000 sheets. I’d love to see a picture of your cranes on your wedding day!!
Great post. I used to be checking continuously this weblog and I am inspired! Very useful information specially the remaining phase 🙂 I handle such info much. I was looking for this certain info for a long time. Thank you and best of luck.
You made my day 😀 And probably the rest of my year. I’ve been searching and searching for information how to string them, so this helps me alot.
Can’t really express how happy it makes me having found this information 😀
Nephew getting married in May. We have 1000 cranes already folded (completed over the holidays!). I’m in charge of stringing! Yikes! Your blog has been so helpful and I plan to give clear fishing line a try. So, I string the crane through the back, then seed bead, then knot the fishing line. Is it easy to knot the fishing line under the bead? Do I have to be careful with knot placement so the fluidity of the line doesn’t get skewed?
Thanks!
Hi there! It makes me very happy to hear this was helpful for you!! Congratulations on getting through the folding process…now for the stringing…yes, you string the crane (top down through bottom) so that the seed bead will be “under” the crane. Then, if I remember correctly, I just tied a simple knot “around” the bead. In terms of knot placement, I found you need to be mindful, but not overly precise in placement. At the end, there is a lot going on with all those beautiful cranes, so you just need to be fairly consistent, not perfect, and no one will notice if they are perfectly spaced. I actually think not too perfect placement is better, because it lends an organic, natural effect to the end result. Happy stringing!!
Hello! Great informative piece. Question for you – in Asia, I understand that they leave out step 13 in the illustration you have above. And then fit the cranes one on top of the other without actually having the crane ‘in flight.’ I’ve seen beautiful mobiles made like this. Have you had experience in piecing these together at all? I am making my first one – but haven’t had experience with piecing these together one pocketing right into the other.. They are beautiful like this as well.
Hi! I remember finding your blog post months back when I set about making the cranes for my own wedding. Just wanted to say thanks for the post and that yours looked terrific! Also–you noted that using a glue gun on fishing wire will melt the wire, that wasn’t the case for us. I used hot glue to separate all of my cranes from each other (instead of using a bead) and it worked really well and we never had a problem with melting! Maybe it depends on the thickness of the fishing line? Just thought I’d let others know that it’s also an option!
How do you keep them from tangling when being hung outdoors from a gazebo on a windy day?
That’s a great question. Since my birds were indoors, I don’t have solid experience to back this suggestion up, but here’s what I’m thinking. I’d be sure to use very strong fishing wire, and then at the end of each strand, tie on a really heavy bead–or something like it–that would be both decorative but also help weigh each line down and keep them from blowing and tangling. Hope that helps!
Thank you so much! Like you I believed folding the cranes would be the hard part! However, I realized I needed to string and transport them- thank you for sharing how you did it!